At Bedtime Board Game we are always striving to help young kids and their families take the struggle out of bedtime. Our game provides a playful, cooperative and customizable way for children to accomplish bedtime tasks like putting pajamas on, bathing, brushing teeth and putting toys away. They earn rewards along the way, and their parents and caregivers earn the joy of a fun -- rather than forced -- evening routine.
Our team is also constantly on the lookout for other tools, tips and products that can improve families’ evening routines and sleep experiences, especially when they provide opportunities for bonding. That’s why we’re proud to present our new series of bedroom and sleep-themed craft projects. The projects will be quick and easy for parents to do with their children, often with common household materials. And the finished projects will be great additions to children's bedrooms, adding to the sense of love and calm they feel when getting tucked into bed.
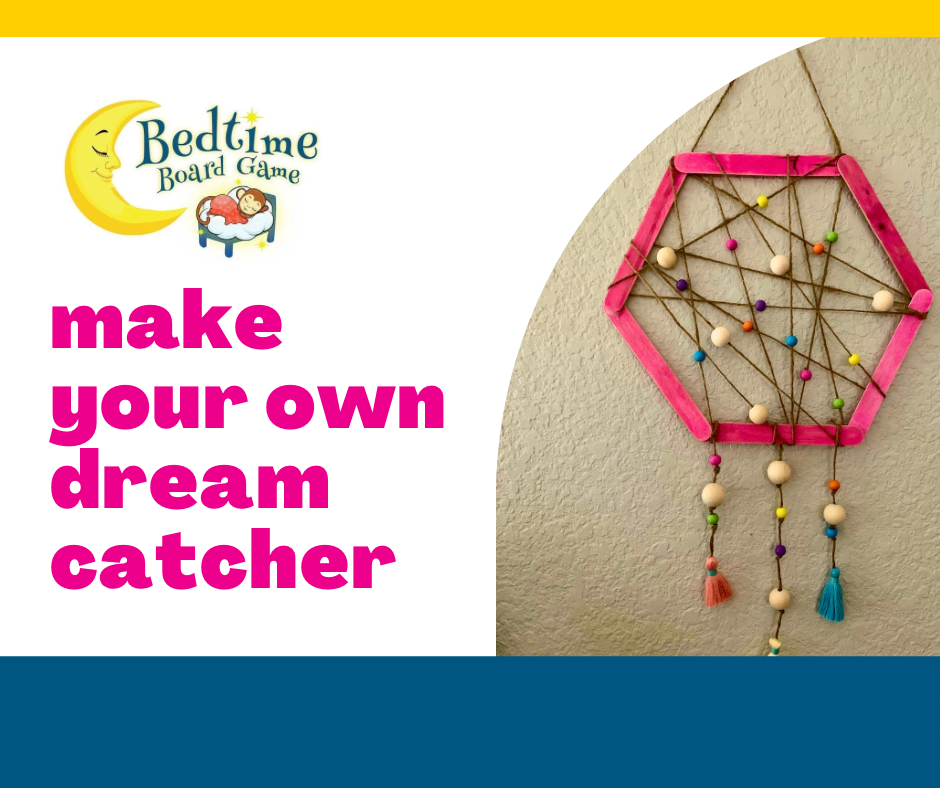
Make Your Own Dream Catcher
Originally created by Native Americans, the dream catcher is now a commonly-used symbol of peaceful sleep. Its storied web is "designed to catch the bad dreams and let the good dreams through.”

Materials
- Six large, wooden craft sticks
- Markers (or paint and a paint brush)
- Yarn, string or twine (about 12 feet)
- A measuring tape
- Glue gun or other fast-drying craft glue
- About two dozen beads in assorted sizes and complementing colors
- Tassels (or yarn to make your own)
Step 1: Color your craft sticks
We used a pink Crayola washable marker and colored both sides of the six sticks. You could also choose to paint the sticks and allow additional time for the paint to dry.
Step 2: Glue sticks into a hexagon
We laid our sticks in a hexagon shape on a counter top before adding a dot of hot glue to each end to secure them in place.
Step 3: Measure, cut and tie your string
Measure then cut approximately 10 feet of the string you will use for the dream catcher’s web. (We chose twine.) Tie one end of the string onto the dream catcher hexagon structure using a double knot and then secure it in place with a dot of hot glue.

Step 4: String all your beads
Before you start weaving the web, string all the beads you plan to use for the interior of the web. We used 17 in alternating colors and sizes. (Most of our beads came from this Melissa and Doug set my daughter already had, but any beads that fit onto your web string will work.)
Step 5: Wrap your web
Once you’ve strung all the beads you want in your web, begin wrapping the string around the hexagon, including one or two beads in each section you wrap. Each time you wrap the twine around the hexagon structure, secure it in place with a dot of hot glue on the back of the hexagon. When you reach the end of the string and can’t wrap any more, tie it in a double knot around the stick structure, and secure it with a dot of glue.

Step 6: Cut and tie three dangling strings for the bottom
Using the same type of string that you used for the web, cut three more strands. We cut 12 inches for the center string and 8 inches for the right and left strings, but you may choose to make yours longer or shorter depending on the beads or tassels you want to add. Tie the three strands to the bottom stick in the hexagon and secure each with a dot of hot glue.
Step 7: Add your beads to the three strings
Select the beads you want on each dangling string, and add them one at a time, tying a knot in the string after each bead to hold it in place. (We used three beads each for the left and right strings and four for the center.)

Step 8: Add your tassels to the bottoms of the three strings
We used tassels we had on hand from another project, but you can purchase them from a craft store or even make your own. We attached one to the end of each dangling string on the dream catcher using hot glue.
Step 9: Add a hanger string to the top of the dream catcher
Cut one last length of string – roughly 10 inches – and secure it to each end of the top hexagon stick using hot glue. This will be the dream catcher’s hanger. Once the hot glue is dry, you are ready to admire your finished product and hang it bedside in your child’s room.